Communication Tools
Communication Tools in Pilot provide digital spaces for faculty and students to interact with each other. These tools include discussion boards, email, groups, and online video conferencing platforms.
Discussions
-
What is the discussion tool?
The Discussions tool is a collaboration area to post, read and reply to threads on different topics, share thoughts about course materials, ask questions, share files, or work with your peers on assignments and homework. See the following link for D2L Brightspace's YouTube videos on the discussion tool: YouTube Playlist page for Discussions
-
How do I create forums and topics?
In Pilot, every discussion has to have at least two parts: a Forum and a Topic. A forum is like a folder. A topic is what goes inside the forum. Topics are where discussions actually take place. If you don’t have topics, you won’t have discussions. Every topic has to be in a forum. A forum can have as many topics as you want, but must have at least one.
Create a Forum
To get started, click “Communication” on your course navigation bar, then click “Discussions.”
Click the blue “New” button and choose “New Forum.”
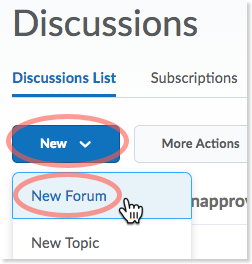
On the “New Forum” page, add a title for your forum. A “Description” is optional, but can be a good place to include instructions for discussions.
Video: Create a Forum
Create Topics
A forum is useless without a topic. Topics in Pilot are where discussions take place and each topic must be in a forum. You can put as many topics in a forum as you like. To create a new topic, go to your Discussions page and click the blue New button. Select New Topic.
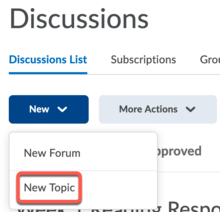
Select the Forum you want to place your topic in from the drop-down list. Click New Forum if you want to create a new forum for your topic. Enter a Title and Description for your topic, the topic type, and then select from the following options:
- If you want to enable anonymous posting to the topic, select the Allow anonymous posts check box (Note: You cannot evaluate anonymous posts.)
- Select the A moderator must approve individual posts before they display in the forum check box to require moderators approve posts before they appear in the topic.
- Select the Users must start a thread before they can read and reply to other threads check box if you want users to start a thread before they can read and respond to other threads in the topic.
(insert gif)
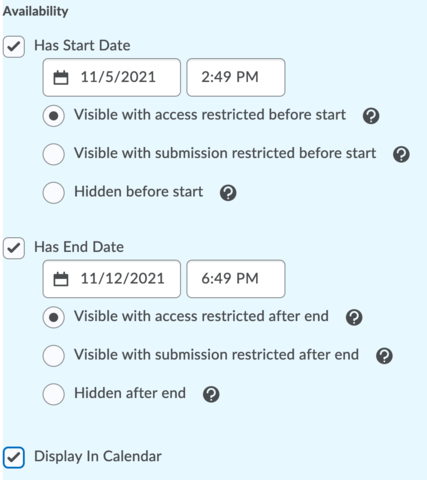
Next, go to the restrictions tab and select a Visibility option for your topic. Note: If your topic is visible for a specific date range, select the Has Start Date and Has End Date check boxes to set your availability. You can also have dates Display in Calendar. Make sure you Save your changes.
Video: Create a Topic
-
What are Locking Options? Is that different from Availability?
Availability vs Locking Options
Further down the page when you’re creating a forum, you’ll find two sections that determine students’ access to the forum—and all the topics in it:
- Availability lets you set a period of time during which students can see the forum. Outside that range, the forum disappears to them. You will still see it, but your students won’t. You can also hide the forum and make it visible manually. You don’t have to choose a date range.
- Locking Options let you prevent students from making new posts or editing existing posts. They can still see a locked forum and read everything there. But they can’t change anything.
Video: Lock a Discussion
-
How do I use release conditions for my discussions?
Release Condition in Discussions
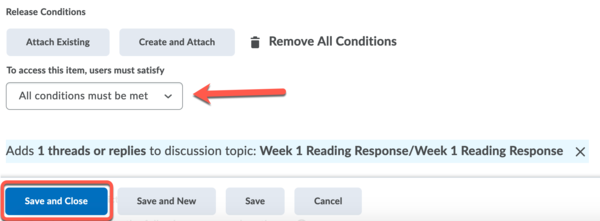
For forums and topics, the Restrictions tab lets you customize availability based on Release Conditions, such as whether the student has viewed a specific content topic, posted in a particular topic, etc. From the restrictions tab, scroll down to release conditions and click on the gray button labeled Create and Attach. This will prompt you to select the Condition Type and complete the Condition Details. Click Create.
(insert gif)
Once release conditions have been created, they will appear under the release condition section of the restriction tab. You can have more than one release condition, and can decide whether students must meet ALL or ANY of the conditions before being granted access to the discussion board. Make sure you Save any changes.
-
How do I participate in a discussion?
Create a thread in Discussions
Click on the topic where you want to post and click Start a New Thread. Enter a Subject and type your post. After you've typed your post, you can also select the following options:
- Selecting Pin thread keeps the thread at the top of the list.
- Select Post as Anonymous to post anonymously (this is only available if the discussion board settings allow anonymous posts)
- Select Subscribe to this thread to receive updates on the thread via your selected notification method.
(insert gif)
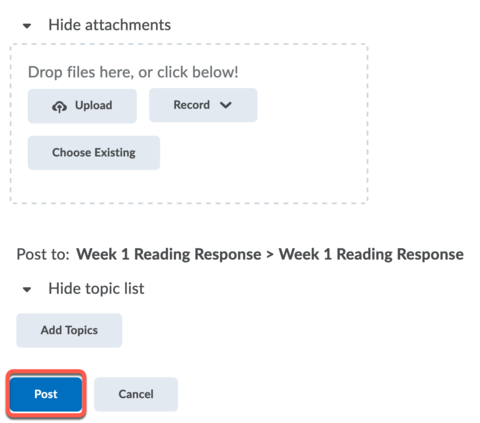
Pilot provides options to Add attachments from your computer files or record a response. The discussion tool also allows you to post to several topics at once. To post to other topics, click Post to Other Topics and then Add Topics. Here, you'll select the topics you would like your thread to appear in. To post in every topic simultaneously, select the Select All check box, then click Add Topics. When you're finished, click Post.
If the topic is moderated, your post will not appear until a moderator approves it. Moderated topics will display Moderated beside the topic name in Discussions List. Inside the topic, all threads track how many Unapproved replies each thread contains. Inside the thread, any posts requiring approval display Approve Post in the subject header.
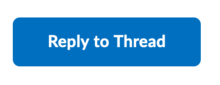
Reply to a thread in Discussions
Locate the thread you want to reply to and click on the title of the post. Select the blue button labeled Reply to Thread.
Enter your reply in the HTML Editor. To include the original post’s text in your reply, click the Add original post text link. Set any other options you want including:
- Select Post as Anonymous to post anonymously.
- Select Subscribe to this thread to receive updates to the thread via your selected notification method.
- Select Add attachments and click on Upload or Choose Existing to locate the file(s) you want to attach, or, if you are using a supported browser, drag and drop your files onto the attachments upload target. You can attach as many files as you want or record a response. When finished, click Post.
-
Can I grade student discussions?
Video: Add a Rubric to a Discussion Topic
Video: Grade Discussion Topics
Video: Assess From Within a Thread
-
What if I want a discussion board available for a specific group of students?
From within the discussion forum or topic, go to the restrictions tab and scroll down to Group and Section Restrictions. Under “Group and Section Restrictions,” you can limit access to a forum to only the students in a group or section. This is especially helpful when you want students to do activities in small break-out groups.
There is also an easy way to create topics for groups. At the time that you create the groups for your course, have Pilot also create discussion items for the groups. See the video below for more information.
Video: Groups & Discussions
-
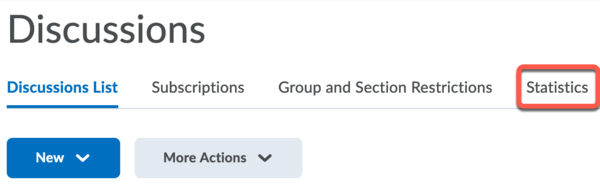
How can I see the statistics for a discussion topic?
Accessing Statistics for Discussions
To review statistics for discussions based on users, groups, or topics, go to your Discussion List and click on the Statistics tab.
From this page, you can view the number of posts a student has written, replied to, and read. You can also filter the stats by groups or by the forums and topics. To print, click on the gray button labeled "Export to CSV File" in the upper left corner of the page.
-
Can I export all discussion posts for a topic?
Exporting All Posts in a Topic
Follow the procedure below for each Discussion topic from which you want the posts exported.
- Go to the Discussions tool.
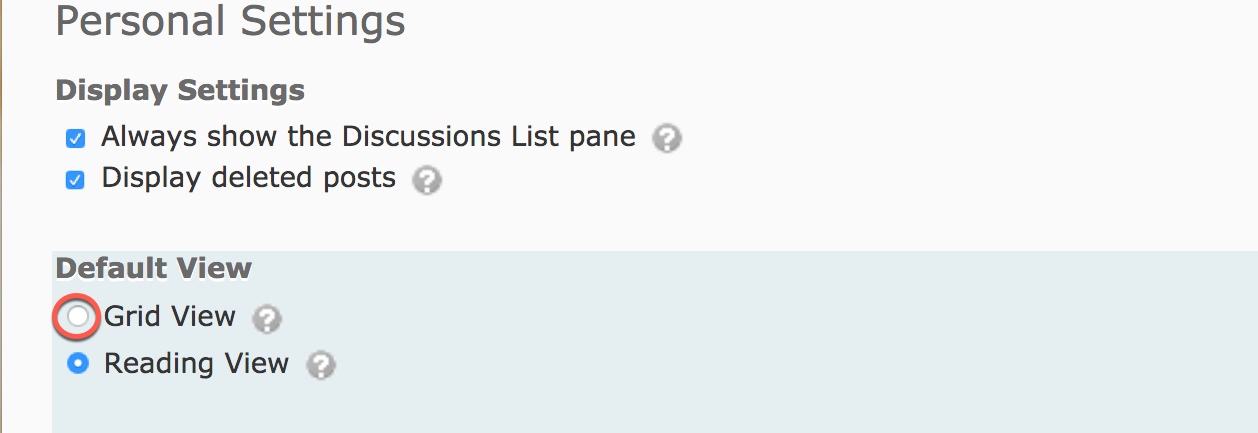
- Click on Settings near the upper-right corner
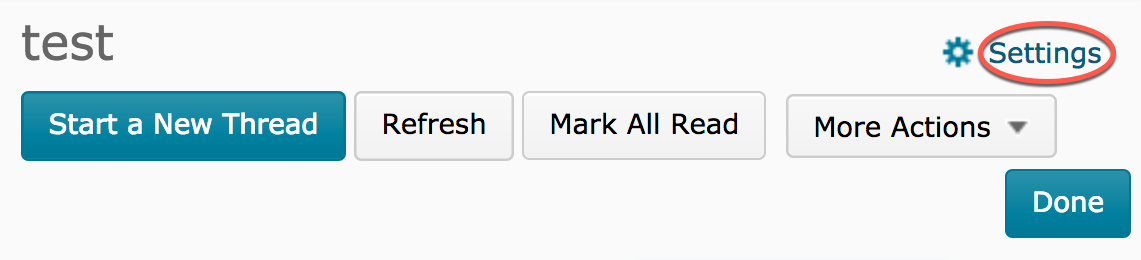
and select Grid View under “Personal Settings” if not already set.
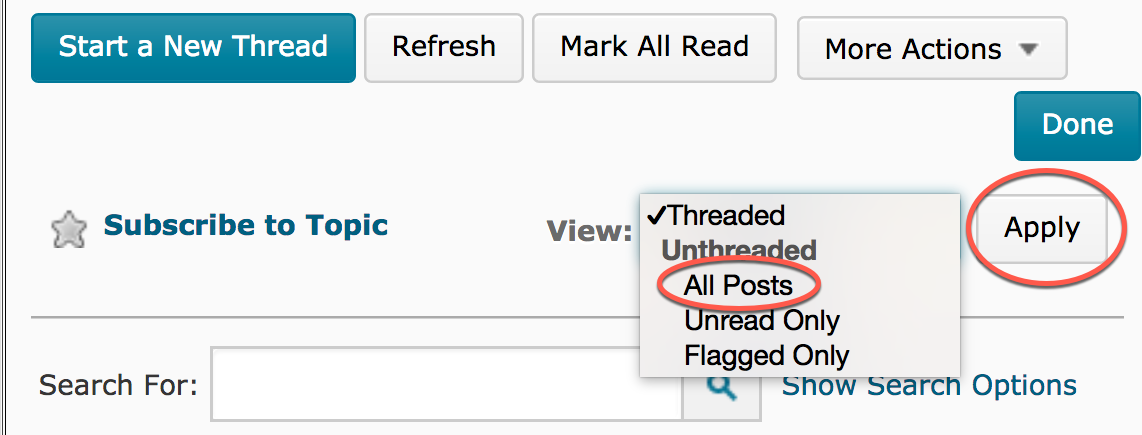
3. Next, select a topic within a forum and change the view to “All Posts” (press the Apply button).
4. Change the number of posts viewed at a time to the highest possible option; typically, this is 50. If there are more posts than the number viewed at a time, you will have to repeat this procedure for each page to include all posts.
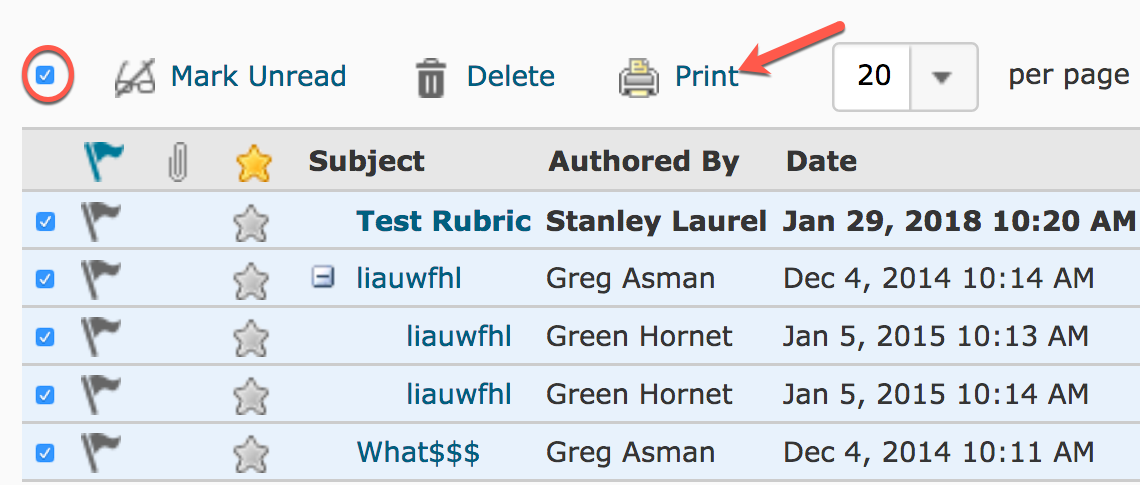
5. Select the ‘Select all rows’ box just above the message headings and select the “Print” icon.
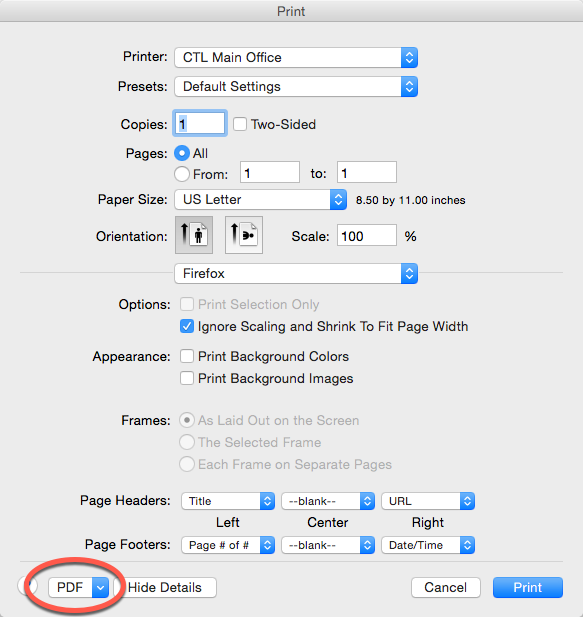
6. This brings up a scrolling “Printable View” window containing the posts. Select “PDF” to save as a .pdf file and press the Print button.
-
Is my Pilot email linked to Outlook?
Instructions are forthcoming, by the end of the Fall 2021 semester.
-
Where is the email function located in Pilot?
Instructions are forthcoming, by the end of the Fall 2021 semester.
-
How do I view my sent mail?
Instructions are forthcoming, by the end of the Fall 2021 semester.
-
How do I email the entire class at one time?
Email Your Whole Class
You can email the students in your Classlist and Pilot will send the messages to your students’ Wright State email addresses. The return address is also your Wright State email address. Although you can send a message from within Pilot, you will not receive replies in the learning management system. Any further email communication occurs in the Wright State email system. To email your whole class, see instructions below.
- Click “Classlist” on your course’s navigation bar and choose Classlist from the drop-down menu.
- Click the “Email Classlist” button, which is in the row of buttons just below the page title “Classlist.”
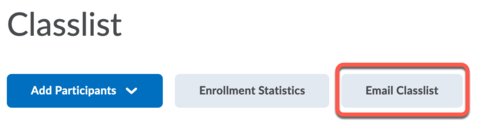
- Scroll to the the bottom of the list of students and click “Send Email” to get the Compose Message screen to appear. In the “Compose New Message” window, you’ll see all your students’ email addresses in the “Bcc” field. That’s normal. You don’t need to put anything in the “To” or “Cc” fields. After you compose your message, click on the “Send” button at the top of the window.
(insert GIF)
-
Can I change my email signature in Pilot?
Pilot can add a custom “signature” new emails. Getting to that setting is a little tricky, though. In most places you would expect to find it, faculty and students either don’t see the option or get an error page when they try to access it. But it is available to faculty and students under email settings in the “Sent Mail” area:
- Click “Communication” inside a course and select “Email” from the menu.
- On the “Compose New Message” screen, click “Sent Mail,” a button near the top right.
- On the “Sent Mail” screen, click the “Settings” link and you should be able to add the signature line.
Groups
Collaborate Ultra
-
What is Collaborate Ultra?
Collaborate for Live Online Class Meetings
Meet with students live online through Pilot using Collaborate Ultra. Narrate a slide show, share a white board that you and your students can draw on, use break-out rooms for small group discussions, and much more.
It can be found in the Communication Menu and when you select it, there is a ready to use virtual live classroom (named the Course Room) at the top of the screen and you (and your students) just click on it to enter it. If desired, shortcut/link can be added into Content in Pilot as well. Just choose Add Existing Activities from any existing module, then choose External Learning tools and then Collaborate Ultra.
Here are links with more detailed information:
Video: Blackboard Collaborate Overview
-
Where is Collaborate Ultra located in Pilot?
Every Pilot course has a ready-to-use virtual classroom; just click on the Communications menu and choose Collaborate Ultra. When the Collaborate Ultra interface loads, there is a ready-to-use Course Room titled "[course name] Course Room." Just click on it to launch/enter the virtual classroom.

NOTE: this opens a popup window, so you may need to disable your popup blocker or allow the popup to use Collaborate Ultra.
Get the Chrome or Firefox Web Browser
Adding a shortcut/link to Collaborate Ultra under Content in your Pilot course (optional)
In your Pilot course, click on Content in the Pilot menu bar. Create a module or select an existing module to add Blackboard Collaborate Ultra. In the module, click Add Existing Activities, choose External Learning Tools from the dropdown menu, and select "Blackboard Collaborate Ultra" from the alphabetical list of tools.

Support links for Instructors
- Getting Started for Instructors (Moderator role in Collaborate Ultra)
- Help for Instructors/Moderators
Support links for Students
-
How do I troubleshoot issues with Collaborate Ultra?
Collaborate Ultra
Quick tips to avoid or quickly recognize common problems:
- Completely close your browser and open a fresh window before beginning a session
- Only have browser tabs/windows open that you will be using during your session.
- Make sure ALL PARTICIPANTS are using the latest version of their web browser (Chrome and Firefox are strongly recommended, especially for presenters and moderators)
- Connect via Ethernet or ensure you are as close to your WiFi router and that your Wifi connection is strong AND stable
- Know how to access your own experience indicator (either in the participants list or the MyStatus and Settings at the bottom of the page.)
- Instructors: Keep the Participants list open if practical so that you can see EVERYONE’s experience indicators to readily see if a participant is having an issue (their experience indicator will show 2 bars or less and will turn yellow or red.)
Backup Plan:
- Create a ready-to-use backup session OR use your Collaborate Ultra Course Room so you have a “go-to” solution if a session is disrupted and participants are unable to rejoin
- Communicate to your students where the backup session is located and how you will notify them to use the backup session BEFOREHAND, so they know where to go if an issue arises that disrupts the entire session.
What to do when issues come up:
- An issue that impacts only a single user or very few users
- Turn off the webcam(s) if it is on
- Make sure they are using the latest version of their web browser (preferably Chrome or Firefox)
- Have the user experiencing the issue stop application/screen sharing IF that person is presenting
- Refresh the browser page containing the open Collaborate Ultra session
- Quit the browser and try to reconnect (if the above steps do not resolve the problem)
- Contact the CaTS Help Desk
- An issue that affects all users or the entire session:
- Have everyone turn off their webcams (if on) and ONLY have the presenter use theirs
- Mute all microphones (if on)
- Have everyone leave the session, quit their web browser, and rejoin the session
- If the above steps do not resolve the issue, go to your Backup Plan session.
-
What are the basics of using Collaborate Ultra?
Collaborate Ultra is now a standard part of every course in Pilot!
It can be found in the Communication Menu and when you select it, there is a ready to use virtual live classroom (named the Course Room) at the top of the screen and you (and your students) just click on it to enter it. If desired, shortcut/link can be added into Content in Pilot as well. Just choose Add Existing Activities from any existing module, then choose External Learning tools and then Collaborate Ultra.
Here are links with more detailed information:
- Collaborate Ultra Technology Requirements
- Joining a Session
- Collaborate Ultra Interface
- Using Audio and Video
- Recording Sessions
- Getting Started for Instructors
- Getting Started for Students
- Instructor/Moderator Role Support
- Participant/Student Role Support
Webex Education Connector
-
How do I add Webex to my Pilot course?
Webex Education Connector Tutorials
The Cisco Webex Education Connector is an external learning tool in Pilot that is used for conducting classes in a live virtual classroom. This tool can be used to schedule virtual class meetings, promote online group work, and to schedule virtual office hours using Cisco Webex Meetings.
How to Add the Webex Education Connector to Pilot
To utilize the Webex Education Connector in your course, you must add the Webex External Learning Tool in Pilot by going to your Content tab and creating a module. We suggest creating a module labeled, “Webex” or “Class Meeting.” This makes the link easy to find for the students.
Once you have created a module for your Webex Education Connector, you will go into that module and click on the gray button labeled Add Existing Activities and select External Learning Tools.
Manual insert image: http://blogs.wright.edu/learn/pilot/files/2020/11/webex1-1024x574.jpg
This action will open a small window with all the External Learning Tools that are offered in Pilot. You will scroll all the way to the bottom of the list and click on Webex.
Manual insert image: http://blogs.wright.edu/learn/pilot/files/2020/11/webex2-1024x534.jpg
After selecting Webex, it will populate in your chosen module as a link for both you and your students to access.
Manual insert image: http://blogs.wright.edu/learn/pilot/files/2020/11/webex3-1024x433.jpg
Setting up your Webex Education Connector
To customize your preferences in the Webex Education Connector, click on the Webex link in your Content module. If this is the first time you have accessed the tool, it will automatically take you to the Setup tab.
In the Setup tab, you can customize the following Webex Education Connector preferences:
- Choose your features: Classroom Collaboration, Virtual Meetings, and Office Hours are all disabled by default. Check the features that you want to be available for your course and select Apply. Then, each feature you selected appears as its own tab.
Manual insert image: http://blogs.wright.edu/learn/pilot/files/2020/11/webex4-1024x361.jpg
- Time Zone: Regardless of your location while teaching the course, the Time Zone for the course should be set at GMT-4:00, Eastern (New York). Once you’ve ensured this time zone has been set correctly, click on the blue Save button.
Manual insert image: http://blogs.wright.edu/learn/pilot/files/2020/11/webex5-1024x248.jpg
- Authorize with LMS: Authorize the Webex Education Connector before you start to use its features. Enter the same credentials you use to sign in. If this button is blue, you will need to authorize. If this button is gray, it has already been done.
- Webex Meetings Attendance Grading: You can award participation points to students automatically when they attend a meeting or class using the Webex Education Connector. This sets up a grade item in your Gradebook in Pilot. If you would like to turn on attendance grading, select the blue button labeled Turn on.
Manual insert image: http://blogs.wright.edu/learn/pilot/files/2020/11/webex6-1024x213.jpg
- Reminder Bot: The Reminder Bot posts a message into the Webex Teams space (Classroom Collaboration) before a Webex meeting is about to start for that class or meeting. Select Turn On and select the amount of time before your class you would like the reminder to be sent.
Manual insert image: http://blogs.wright.edu/learn/pilot/files/2020/11/webex7-1024x393.jpg
Support Links for Instructors
Support Links for Students
-
What are the system requirements for the Webex Education Connector?
Webex Education Connector
Browser Requirements
While Webex is compatible with most browsers, we strongly recommend using Google Chrome or Mozilla Firefox. The links to download these web browsers are found below:
-
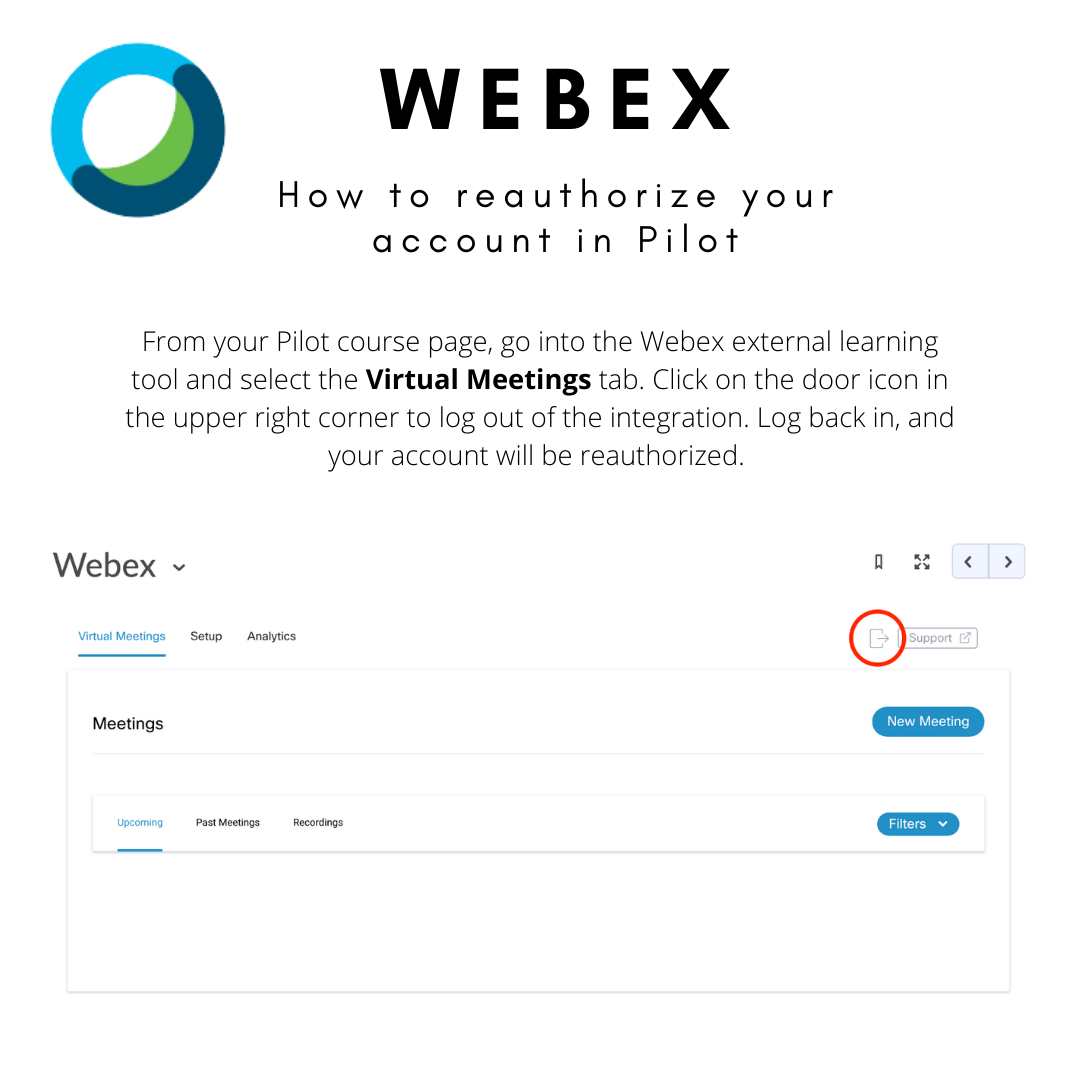
The Webex Education Connector in Pilot is telling me I need to reauthorize my account. How do I do that?
From your Pilot course page, go to the Webex external learning tool and select the Virtual Meetings tab. Click on the door icon in the upper right corner to log out of the integration. Log back in, and your account will be reauthorized.

