Content
- About the Content Area
- What is the Content Tool?
- How do I import course materials from a class I taught previously?
- Once I moved my old course material into a new course, how do I fix the dates on assignments?
- How do I create modules and submodules?
- How do I upload content to my modules?
- Can I add a link to an existing class activity to my content module?
- Can I create content from within Pilot?
- How do I edit my content?
- What are release conditions? Are they different from availability?
- How do I ensure that my content is accessible for my students?
- Can I delete an entire module?
- Why won’t my files upload?
- I uploaded my PowerPoint slides, but they aren’t displaying right. How do I fix this?
- How do I download my course files?
- How do I add content files from manage files?
- How do I set release conditions?
- How do I add date restrictions to content modules?
About the Content Area
The Content area in Pilot is the primary place to add files and other learning materials to be shared with students. It can also be used to organize all course activities.
What is the Content Tool?
The Content tool is used to create, edit, and organize course materials such as syllabi, lecture notes, video, audio and readings. The Content tool allows users to navigate through course content and activities. You can also:
- Import/Export existing content.
- Change the way your course displays content.
- Create new or link to existing dropbox folders, discussions and quizzes.
How Content is Organized
Modules: Modules are like folders on your computer, and act as an organizational tool that contains information. Modules must be populated with topics (or files) in order to display content.
Sub-Modules: Sub-Modules are simply modules nested within other modules. Similar to modules, they hold and organize topics.
Topics: Topics are the actual content items. Topics can be created in Pilot using the HTML editor, or they can be files uploaded into Pilot.
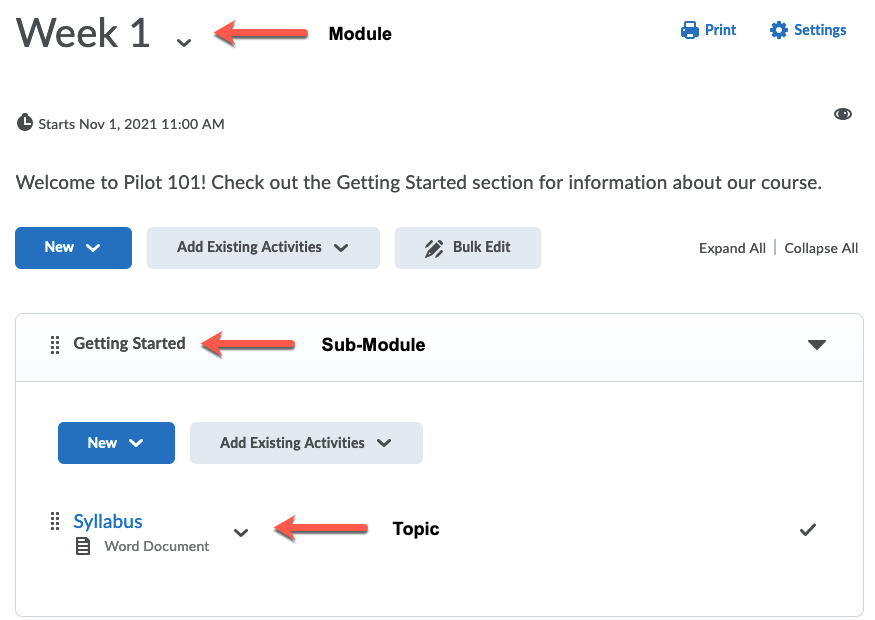
Content Tool Structure
Within the Content Tool, you will find four primary areas:

Overview
When users access a course’s Content tool for the first time, the first page they land on is the Overview (unless it has been left empty). Use the Overview page to orient users to the course, content materials, and course expectations. You can insert course overview information using the HTML Editor beneath the Overview title, and you can add a file attachment by dragging a file from your computer onto the upload target, or by clicking Add an Attachment from the Overview context menu.
Bookmark
The Bookmarks area is a user-specific place that holds links to bookmarked content topics. Click the Add Bookmark icon while viewing a topic to add it to your bookmarks list. The number beside the Bookmarks link indicates how many bookmarks you have.
![]()
Course Schedule
The Course Schedule area shares dates for the course, including due dates. When items are overdue, the dates will appear as red. The links that appear with the dates will allow learners to click directly on the item that needs to be completed.
Table of Contents
The Table of Contents panel lists all modules and topics available in your course. You can add new topics to existing modules by dragging and dropping files from your computer onto upload targets on the Table of Contents page, and you can also rearrange course materials by dragging and dropping topics between modules. The number beside each module name in the Table of Contents panel listing indicates the number of topics you have set completion tracking for.
How do I import course materials from a class I taught previously?
Use course Content, Quizzes, Dropbox folders, Grade items, Discussions, and other components from another course by using the Import/Export/Copy Components tool which can be found under Course Admin. To access components from other courses, you have to be enrolled in that course’s Classlist in a Faculty, Co-Faculty, or TA-Designer role. If you want to import content from another instructor’s Pilot course, they can add you to their Classlist with one of these roles.
To import course components, open the new course (the one receiving the content), and click on Course Admin in the navigation bar. Choose Import/Export/Copy Components from the menu.
Click on the button beside Copy Components from another Org Unit (in Pilot, the “org unit” is a course), then click on Search for Offering. This will open a new window where you will enter the name of the course from which you are exporting in the Search bar. Select the course from the search results and click on Add Selected, at the bottom of the screen.
On the next screen, click the button beside “Copy Components from another Org Unit” and choose either to Copy All Components, or to Select Components to copy.

If you chose to copy all components, the export will begin and you will receive a notification when it is completed.

The video below shows an example of how to copy your course content:
If you choose to Select Components, a list of course components will appear and you can choose which items to copy. For example, if you choose “Content”, you have the option of either copying all items under Content or choosing individual items. Once you have made your selections, Pilot will prompt you to confirm each selection. Click on “Finish” and the export will proceed. You will receive a confirmation notice when it is finished.
Once I moved my old course material into a new course, how do I fix the dates on assignments?
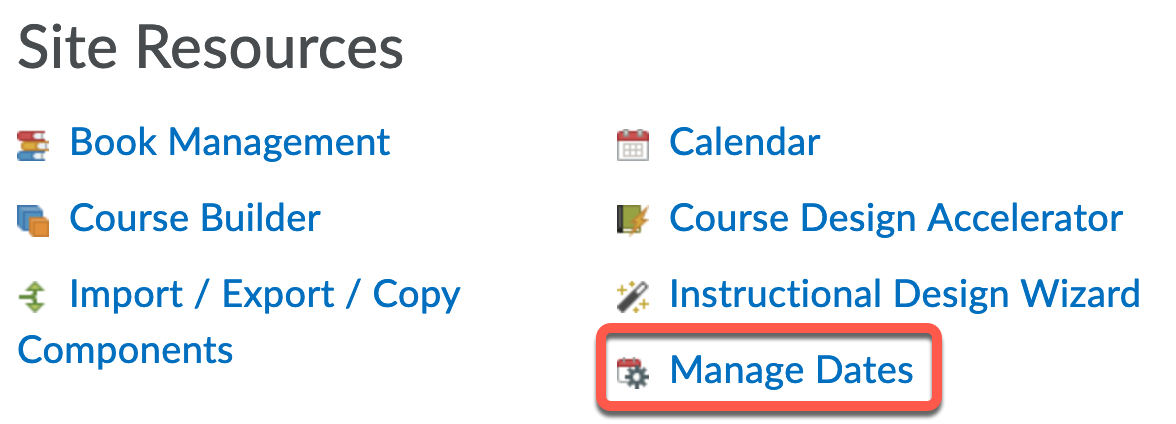
To view and bulk manage dates by each tool in Pilot, go to “Course Admin” and then choose “Manage Dates.” This can be found under the Site Resources category.
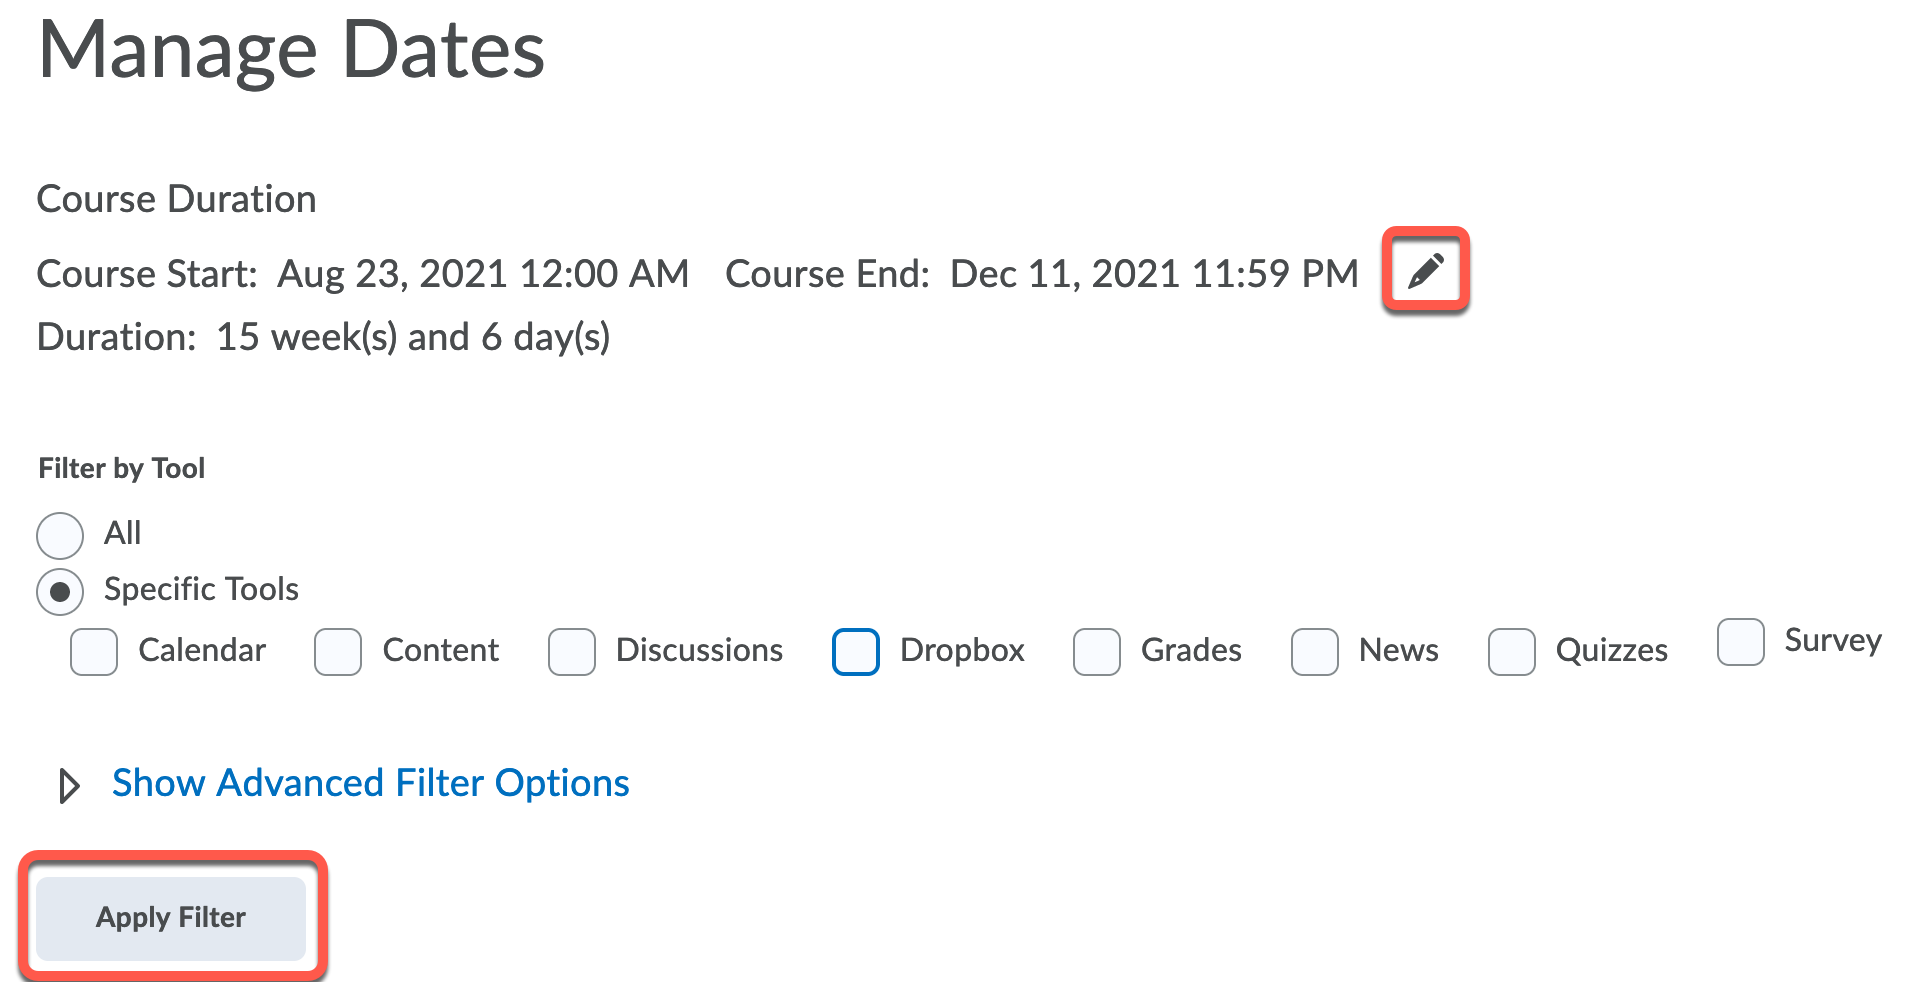
From this page, there are several options for managing dates throughout the course. You can edit the course start and end date by clicking on the pencil icon to the right of Course End. Also, if you do not want to edit the dates on everything at once, there is a way to filter items by tool. To do this, select the bubble next to Specific Tools. Then check the box next to each tool you'd like to manage and click Apply Filter.
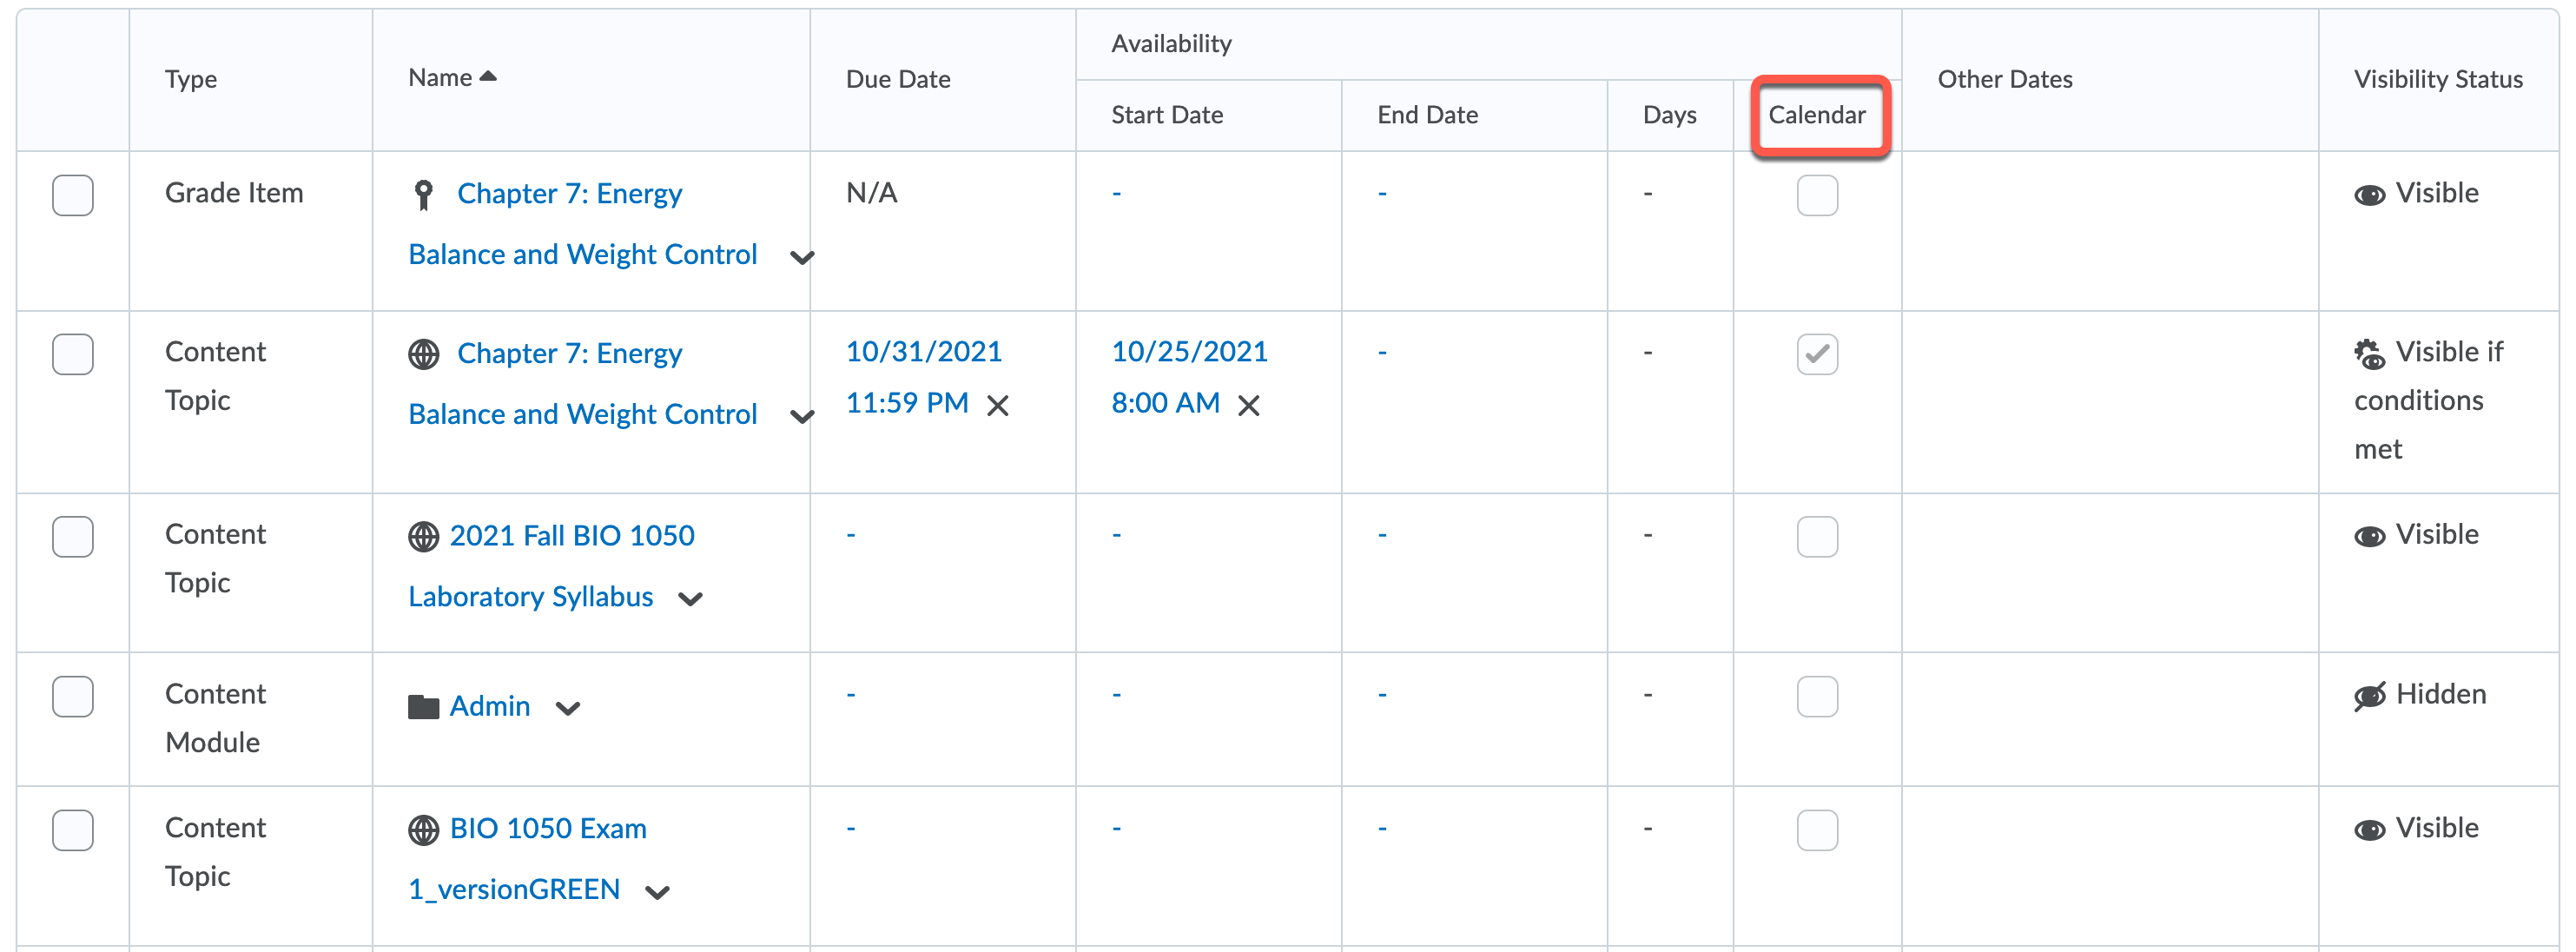
While in that view, you can edit the dates by clicking on the dates in place and making changes. You can also place a check in the Calendar Column to add those dates to the Course Calender on the Students Home Page.
To change several dates at once, you can also use the Bulk Edit Dates and the Bulk Offset Dates function. The Bulk Edit Dates function will allow you to select multiple assignments that have the same date restrictions. The Bulk Offset Dates function works well if you're making minimal changes to your course and want to keep the same general due dates. Offsetting the dates from the previous semester to the current semester can save a lot of time.

How do I create modules and submodules?
Modules and sub-modules are created to organize course materials within the Content tool.
Before you can add topics (i.e. documents, images, media files, URL links, etc.) to your course, you have to create a module to hold them. Sub-modules can be created within modules to establish a deeper hierarchy.
Click on Content on the navigation bar.
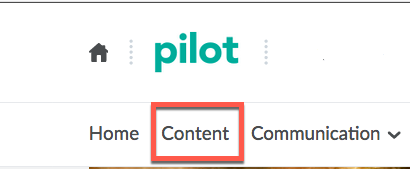
Click on Add a module and type the name of the module. Then press Enter to create the module.

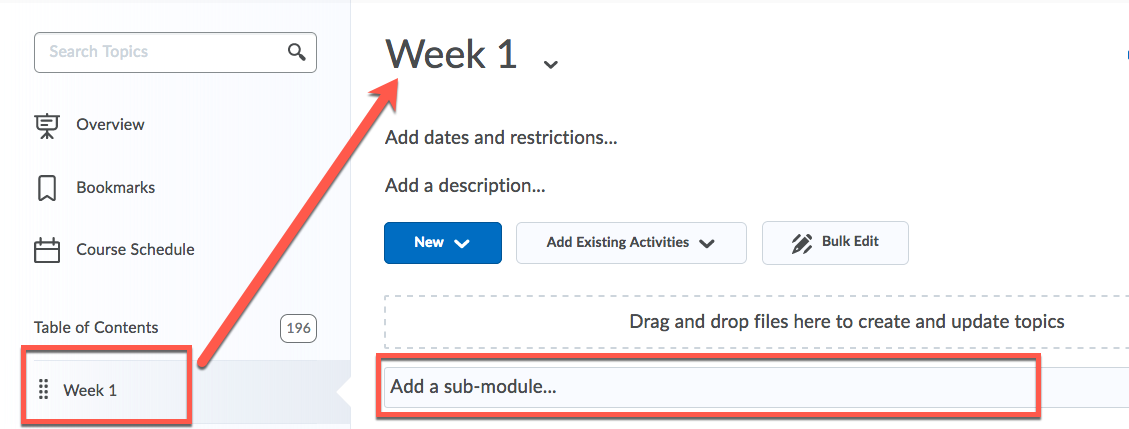
To add a sub-module, click on a module where you want to add it under Table of Contents so that the module opens. Then, type the name of the sub-module into the bar that says, “Add a sub-module“.
How do I upload content to my modules?
In your course’s Content area, you can upload content files (such as your syllabus, powerpoint slides) for your students. Every content file must be in a module. So you will first need to create a module (see Add Modules and Sub-modules). Then you can upload files into it.
Create a Module
Before you can add topics (i.e. documents, images, media files, URL links, etc.) to your course, you have to create a module to hold them.
Click on Content on the navigation bar.

When the Content page appears, on the left side of the screen under Table of Contents click on Add a module and type the name of the module. Then press Enter to create the module.

Upload Files
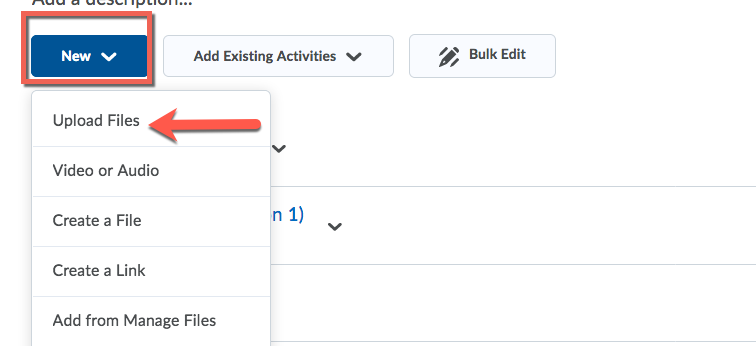
In the “Table of Contents” on the left of the Contents screen, click the module that you have created. Then click the blue button that says New and choose Upload Files.
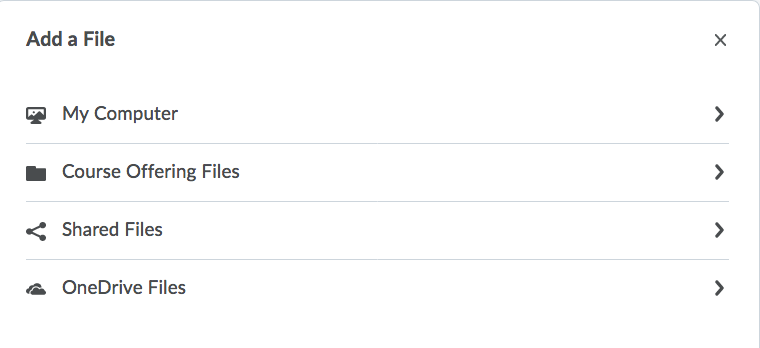
On the screen that appears, select where you want to upload the file from and then continue the upload process.
The file you uploaded will now appear as a link in the Content module.
Can I add a link to an existing class activity to my content module?
You can add an existing course activity to any Content Module so that your students can easily access it.
Click on the module you want to add a course activity to from the Table of Contents.
Select one of the following from the Add Existing Activities button:
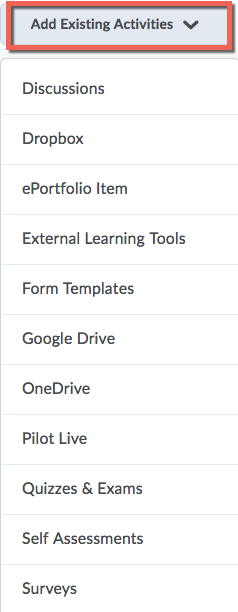
Click on the existing activity you want to insert from the drop-down list.
Can I create content from within Pilot?
Yes, you are able to create content within modules in Pilot. Using the HTML editor, you can quickly create pages for your students that contain images, videos, tables, etc.
To do this, first navigate to the Content area of your course and select the module in which you'd like to add your document. Click on the blue New button and select Create a File.
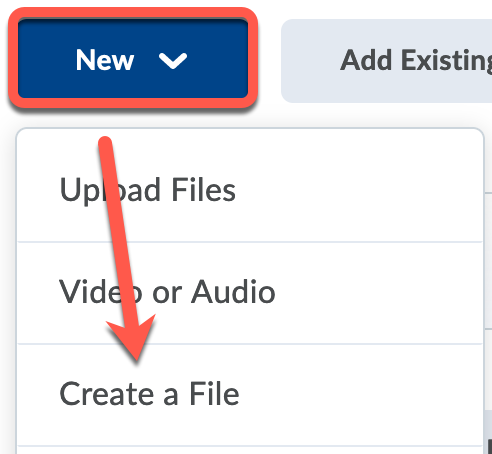
Next, you'll enter your content into the HTML Editor. There are several options if you want to insert tables, images, links, audio/video/animation files, special characters, and equations.

When you're finished, make sure to click on the blue Save and Close button at the bottom of the screen.
Making Your Module Content Accessible
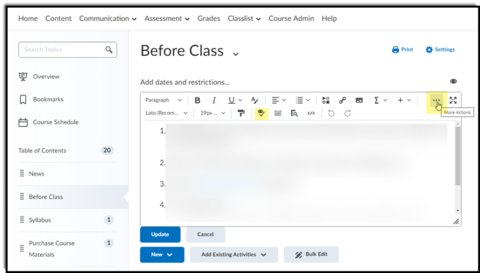
The Accessibility Checker can be used in your content module HTML Editor.
- From the content you are writing, click the three dots. That will add another row of additional features; accessibility checker being one of them. This feature is the eyeball with the checkmark under it.
- Click the Accessibility Checker.
The results will display on the screen:
Making Your Documents Accessible
For best practices in creating accessible HTML documents (and other formats) please see: Accessibility for Online Course Content or our FAQ, "How do I ensure that my content is accessible for my students?"
How do I edit my content?
When you upload a file, Pilot conveniently creates a link in Content. That link’s text is the same as your file’s name. Upload multiple files, and the links appear in alphabetical order. You may want more descriptive links and in a different order. This is easy to fix.
Rename Items
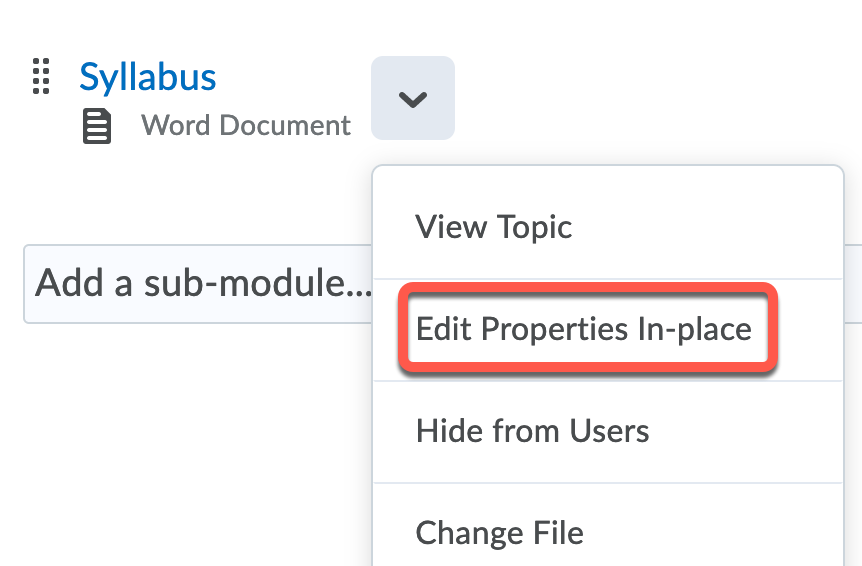
To rename items in your Content area, locate the item you'd like to change and click on the down caret next to the title. Select Edit Properties in Place. Next, click on the title of the item and it will become editable. Type in the new name for the item and click anywhere on the page outside of the text box. The box will disappear and your change will be saved.
Keep in mind that this only changes the link text in Content. It does not change the name of the file it is linked to. If someone downloads the topic, they will get a file with the name that file had when it was uploaded.
Move and Reorder Modules and Topics
Dragging to drop targets is a quick way of reorganizing modules and topics. If you drag a module or topic above or below other modules and topics, a dark blue line appears to indicate you can drop the module or topic there.
If you drag a module or topic over another module, the module appears blue to indicate you can drop it there.
Delete a module or topic
Click on the module you want to delete from the Table of Contents, or select a topic from the Module listing. If you are deleting a module, click Delete Module from the module’s context menu.
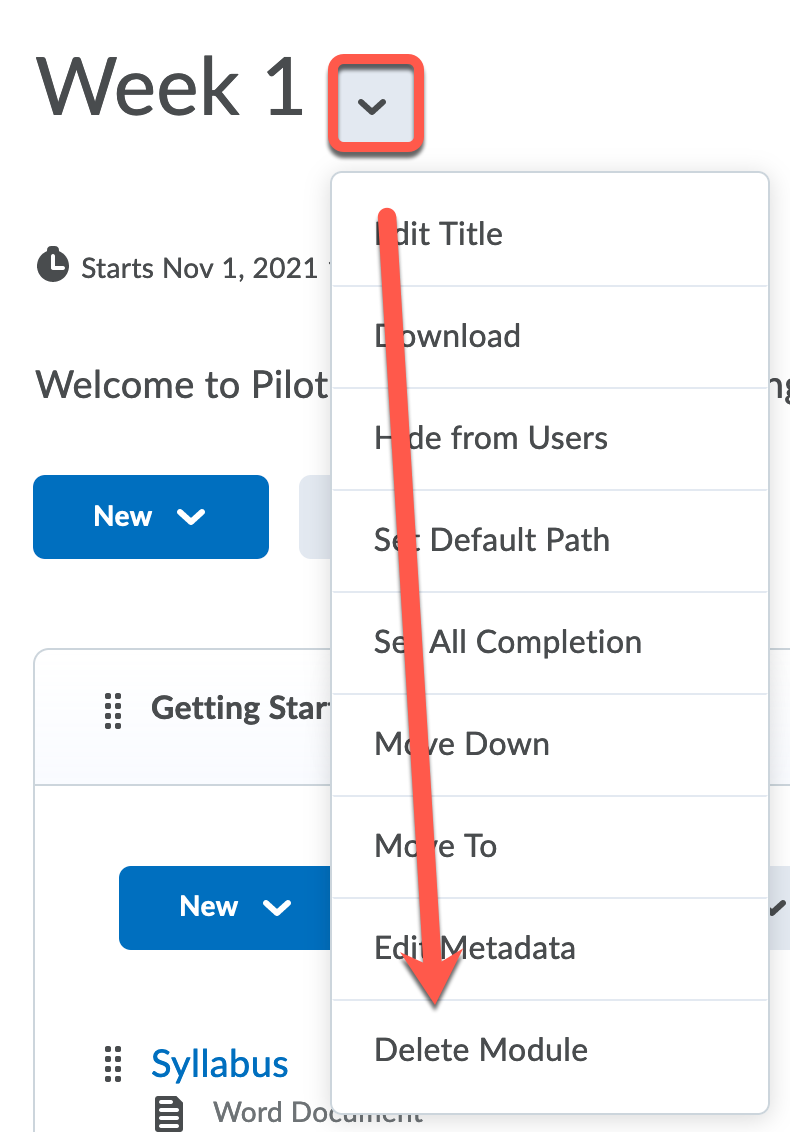
If you are deleting a topic, click Delete Topic from the topic’s context menu.
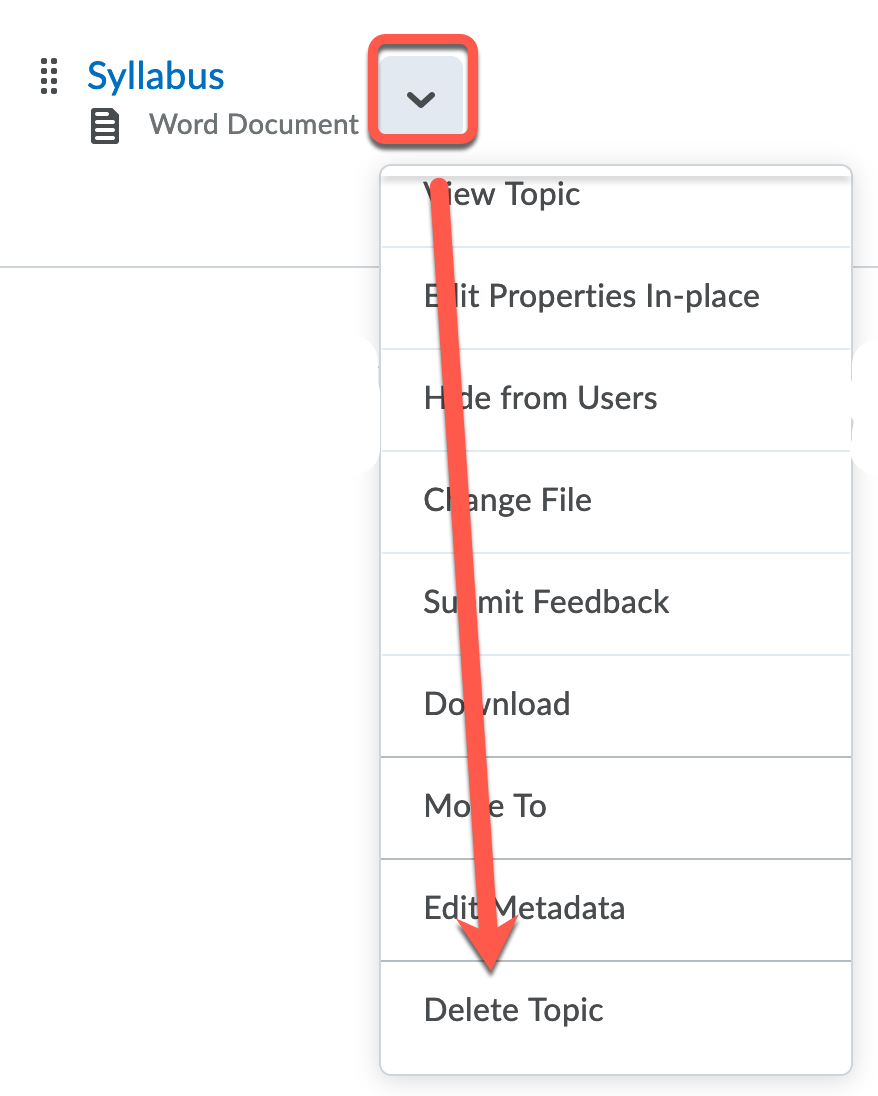
Decide whether you want to remove the module or topic from the Content view only or permanently delete the module or topic from the course (this will also delete all associated objects including discussions, quizzes, etc) and click Delete.

Delete all modules
On the Table of Contents page, click Delete All Modules from Table of Contents’ context menu. Decide whether you want to remove the modules from the Content view only or permanently delete them from the course (this will also delete all associated objects including discussions, quizzes, etc). Click Delete.
What are release conditions? Are they different from availability?
Release Conditions are criteria set by the instructor that the student must satisfy before being able to view a content topic, quiz, discussion board, dropbox folder, or other activity or widget within the learning environment. These are different from availability, which simply outlines parameters on when a student can access an assignment.
How do I ensure that my content is accessible for my students?
Accessibility means that people with a broad range of abilities, including people with disabilities, can perceive, navigate, and understand your content.
The Americans with Disabilities Act led to architectural standards to ensure that elevators, ramps, and other accessibility features were in place. Likewise, we need to put elements are in place that make our online spaces inclusive.
Students who are blind or have low vision may be most likely to struggle with online content, followed by students who are deaf or hard of hearing. But all users benefit from techniques that help those most likely to be marginalized.
If you start with the first three things below, your course will be more accessible for students with disabilities than most courses. Employ all five, and your course content will come close to fully meeting accessibility guidelines.
Top 5 Traits of Accessible Documents
- Headings Have Logical Hierarchy
- Images, Audio, and Video Have Text Alternatives
- Links Have Meaningful Text
- Colors Have Good Contrast
- Reading Order Makes Sense
This guide comes from web accessibility guidelines that help you make content usable by students…
- who are blind or deaf,
- who have physical and cognitive disabilities,
- who have learning disabilities,
- who aren’t native English speakers,
- and, sometimes, pretty much everyone.
These guidelines especially help students who use screen readers. That’s software that reads out loud what’s on a computer, phone, or tablet.
As you can see by the links on the side of this page, there are lots of ways to make your courses more accessible. You don’t have to be an accessibility expert, though, to make a big difference. Start here:
1. Headings Have Logical Hierarchy
Students who use screen readers jump from heading to heading, but only if you make headings right. With headings, they skim a page until they find the information they need. Also, they hear what’s a main heading and what’s a subheading, which helps them make sense of your content.
That isn’t possible if all you do is highlight text and make it big and bold. You have to use heading styles in Word or heading tags in HTML.
The good news: Real headings have one-click formatting. You don’t have to remember what font, size, and color to use every time you make a heading. It’s built into your styles. You save time and make your pages look more consistent and professional.
Heading Tutorials
2. Images, Audio, and Video Have Text Alternatives
A screen reader can’t interpret and describe an image. Include text in your document that describes what a student who’s blind can’t see. Videos may need a special kind of narration called audio descriptions. Students who are deaf or hard of hearing need transcripts for audio or captions for video.
Alternative Text Tutorials
3. Links Have Meaningful Text
A good link tells you at a glance what you’ll get when you click it. That’s helpful for everyone. It’s especially nice for screen reader users. They may listen to a list of links on a page to figure out what’s there and where they want to go next. That only works if links are meaningful, not cryptic URLs or vague phrases like “click here.”
Link Tutorials
4. Colors Have Good Contrast
Good contrast between text and background makes content easier to read. Students with glaucoma and cataracts may see the world through a haze. That makes it even harder for them to read text that doesn’t stand out from its background.
Also, don’t rely on color alone to convey meaning. Color blindness affects 1 in 12 men. If you refer to something only by its color, you may have students who can’t see what you mean. Of course, students who are blind or have low vision may not see your colors at all. Provide a way for those students to get your meaning besides through color.
Color Tutorials
5. Reading Order Makes Sense
Screen readers interpret some documents in surprising ways. They may scramble the order in which they read blocks of text. For example, tables with merged or split cells can get confusing. Tables in Word and HTML all need a little finessing. PDF documents mix things up and need their reading order checked, too.
Reading Order Tutorials
Bonus Tips
Here are a few other ways you can refine your documents’ accessibility.
- Give Word files meaningful names. Then students who download them can recognize the documents by their file names.
- Keep sentences short and clear. The Hemingway App can help.
- Define your document’s language. Mark any passages written in another language. Language in Word. Language in Pilot.
- Use a checklist to remind you of things to look for: Accessibility Checklist, Word 2016.
- Include an accessibility statement in your course. Encourage students to contact you early about accommodations they need.
Can I delete an entire module?
Deleting modules or topics in Content removes them from the Content listing but does not delete the topic files entirely from the course. Topic files will still be available in the Manage Files area unless selected to be permanently removed. Also, please note that deleting a module in Content removes all of the topics within the module.
To do this, click on the module you want to delete from the Table of Contents, or select a topic from the module listing. If you are deleting a module, click Delete Module from the module’s context menu. Decide whether you want to remove the module or topic from the Content view only or permanently delete the module or topic from the course (this will also delete all associated objects including discussions, quizzes, etc) and click Delete.
Why won’t my files upload?
A number of things can prevent a someone from uploading a file to a Dropbox folder, Content, Discussion, or other tool.
File Size
Files larger than 1GB might not upload.
Slow Internet Connection
Although there is no set connection speed required, slow speeds can cause the upload process to time out.
File Name Too Long or Contains Unsupported Characters
Keep file names under 45 characters and avoid the following characters in file names:
\ / : * ? “ < > | ~ # % & + { }
Wrong File
Some applications create a temporary file while you are working. That file usually has a name very close to the actual file you are working with. It’s easy to confuse the two. The names of temporary files often start with a couple extra characters, such as ~$.
More In-depth Information
The information in this tip comes from the following article.
I uploaded my PowerPoint slides, but they aren’t displaying right. How do I fix this?
If you add a PowerPoint file to Content and find that it displays as a jumble of text without the design and layout of your original slide, you will want to switch to “Page” view.
While viewing the PowerPoint in Pilot, scroll way down to the bottom of the page. Click “View as Page.”

The button will switch to saying “View as Text” and your PowerPoint slides will look the way you expect.
Unfortunately, this is an individual preference. Your students will have to click the button themselves.
How do I download my course files?
You can download a .zip file containing all, or some, of the files in the ‘Manage Files’ area of a course. To do this, go to Course Admin and select Manage Files. Check the ‘Select all items’ box at the top of the list of folders and any files in the course root folder. This will select all files in the course.
Note: To download just a subset of the files in the course, check the ‘select’ boxes by the folders and/or files to be downloaded instead of ‘Select all items’.
Select the Download button at the top of the list of folders. The course files will be zipped into a Zip archive. When the Zip archive is ready to be downloaded, click the link presented. You will have the option to save the .zip file.
How do I add content files from manage files?
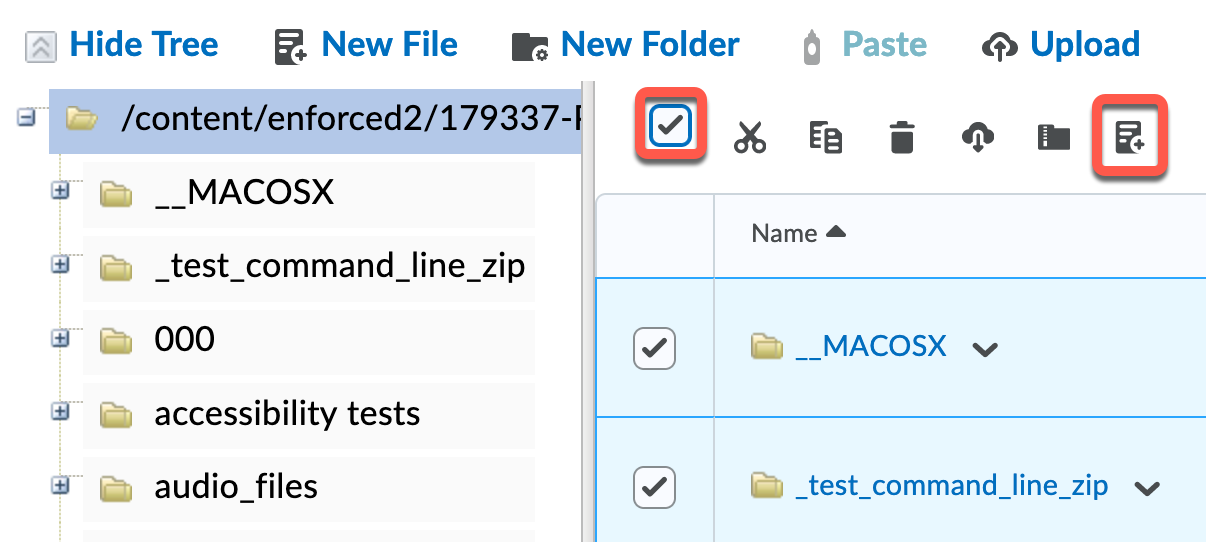
In “Manage Files,” check the boxes next to items you want shown under content. Then click the “Add Content Topics” button (shown in the red box below). It will ask which module you want them in. You can add a new on there if you wish. Once the files have been added, if you need to reorganize anything, you can do so from within Content.
How do I set release conditions?
Release Conditions
When you set release conditions, Pilot can automatically show or hide content items. You can release a content item or module based on whether a student
- has achieved an adequate score on a quiz,
- has posted to a discussion area,
- has viewed another content item,
- is a member of a group or section,
- and many more possibilities.
Add or edit release conditions for a module
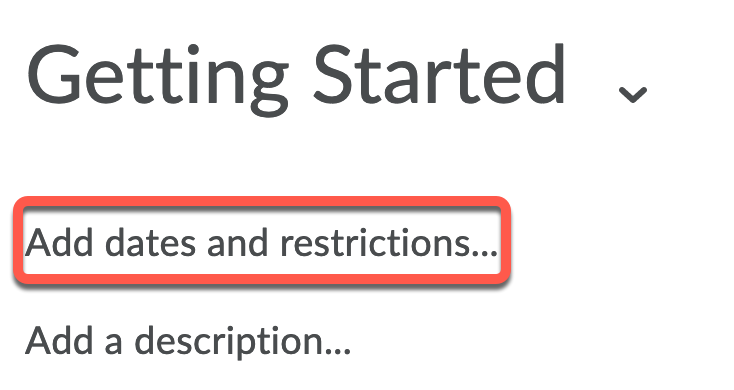
Click on the module name from the Table of Contents panel and select Add dates and restrictions. If a module already has restrictions, click directly on the module’s existing dates and/or restrictions.
To create new release conditions, click Create, then select the Condition Type and complete the Condition Details. Click Create.
To reuse existing release conditions, click Browse, then select a condition. To narrow the list of conditions, choose the tool the condition is based on from the View Conditions for drop-down list. Click Attach.
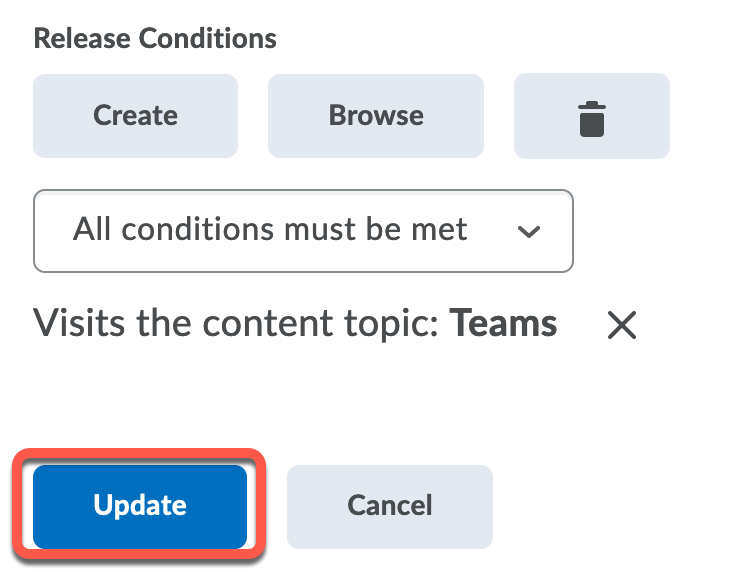
After creating or reusing a release condition, you can add release dates and times for the module and choose whether access to the module is dependent on meeting all or any of your conditions. Click Update.
Add or edit release conditions for a topic
Locate the topic on the Table of Contents page, or click on its module from the Table of Contents panel. Click on the down caret next to the title of the topic and select Edit Properties In-place. Follow the instructions above for creating, editing, and reusing release conditions in a module. The process is the same for adding conditions to a topic.
How do I add date restrictions to content modules?
Start, End, and Due Dates
Add or edit availability and due dates for a module
Click the module name from the Table of Contents panel.
Click Add dates and restrictions… or directly on the module’s existing dates and/or release conditions if there are any.
Do any of the following:
- To add dates for the module, click Add start date…, Add due date…, and/or Add end date….
- To edit dates for the module, click directly on the existing date and/or time fields.
- To delete a date for the module, click a date’s Remove date icon.
Click Update.
Add or edit availability and due dates for a topic
Locate the topic on the Table of Contents page, or click on its module from the Table of Contents panel.
Do one of the following:
- Click Edit Properties In-place from the topic’s context menu.
- Click directly on the topic name (the topic page will load).
Click Add dates and restrictions… or directly on the topic’s existing dates and/or release conditions.
Do any of the following:
- To add dates for the module, click Add due date…, Add start date…, and/or Add end date….
- To edit dates for the module, click directly on the existing date and/or time fields.
- To delete a date for the module, click a date’s Remove date icon.
Click Update.

