Holiday closure

Winter Break: Monday, December 23 through Wednesday, January 1
Wright State University administrative and academic offices will be closed.

CaTS | Information Technology

CaTS Blog

Wright1 Card Outage for 5/1

Friday, April 29, 2016

The Wright1 Card system will be unavailable during the following times due to system maintenance:

  • Sunday, May 1, 2:00 p.m. through Monday, May 2, 4:00 p.m.

During this time, access to the following Wright1 Card services will be unavailable:

  • Online deposits and account statements
  • Sales at off-campus and on-campus merchants (Union Market will be open & accepting cash/credit card)
  • Wright1 and credit card swipes at campus vending machines
  • All pay-for-print card swipes at printing stations, copiers, and laundry (does not include Xerox printer card swipes)

During this time, the Wright1 Card office in 055 Student Union will also be closed.

For questions concerning this maintenance, please contact the CaTS Help Desk at (937) 775-4827 or email helpdesk@wright.edu.

Office 365 Email Update

Friday, April 29, 2016

Microsoft recently made updates to email functionality through the Outlook Web App (OWA), accessible at http://outlook.wright.edu. If you have further questions about this information, please contact the CaTS Help Desk at (937) 775-4827.

Reply All Default

The default setting to respond to emails has been changed from 'Reply' to 'Reply All'. To change this option back to 'Reply', follow the steps below:

  1. Login to http://outlook.wright.edu with your Office 365 username and password.
  2. Click the gear icon in the upper right corner of the page.
  3. Select Mail at the bottom under 'My app settings'.
  4. Click the drop down arrow on the Automatic Processing section.
  5. Select Reply Settings and choose Reply.
  6. Click Save.

"Send" and "Discard" Options

All 'New' and 'Reply' email messages now have Send and Discard options located at the bottom of the message. See the screenshot below.


Changes to "Settings" Options

The Settings option has changed from a drop-down list to a sidebar format. See the screenshot below.

Clutter Settings

Friday, April 29, 2016

What is Clutter?

Clutter is an email sorting tool available to all Wright State Office 365 users. Clutter moves your low priority messages out of your Inbox so you can easily scan for important messages. Clutter analyzes your email habits, and based on your past behavior, it determines the messages that you’re most likely to ignore. It then moves those messages to a folder called Clutter, where you can review them later. You can proactively train Clutter by marking items as Clutter or simply move the items to the Clutter folder. You control Clutter from the Outlook Web App (OWA) options menu. If you find items in your Clutter folder that shouldn’t be there, train Clutter by moving the message back to your inbox. 

Checking Your Clutter Folder

  1. Log in to WINGS (http://wings.wright.edu) with your campus username and password.
  2. Click the Email/Calendar button in the top right corner. This will automatically log you in to Office 365.
  3. On the left-hand side of your email, select the Clutter folder.

Turning Off Your Clutter Folder

  1. Log in to WINGS (http://wings.wright.edu) with your campus username and password.
  2. Click the Email/Calendar button in the top right corner. This will automatically log you in to Office 365.
  3. Click on the gear icon in the upper right-hand corner.
  4. Select Mail at the bottom.
  5. Select Clutter under Automatic Processing.
  6. Deselect Separate items identified as clutter.
  7. Select Save.

Note: To turn Clutter back on, follow steps 1 - 5, then select "Separate items identified as clutter" and click "Save"

Wright.edu Web Updates

Friday, April 29, 2016

On Friday, April 29, an update to the wright.edu homepage was made. 

  • The A-Z search filter is no longer in the top header; it can now be found in the footer of all wright.edu websites, or under 'Directories' in the top menu bar:

  • The admissions section has also been updated and now looks like the picture below:

If you have any questions, call the Help Desk at (937) 775-4827 or email helpdesk@wright.edu.

Verifying Your Connection to the Wright State Domain

Friday, April 22, 2016

Below are instructions to verify your workstation is connected to the Wright State domain. 
Note: Windows PCs are the only operating systems able to connect to the domain.

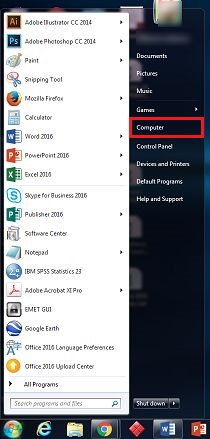
  1. Open the 'Start' menu on your computer and select 'Computer'
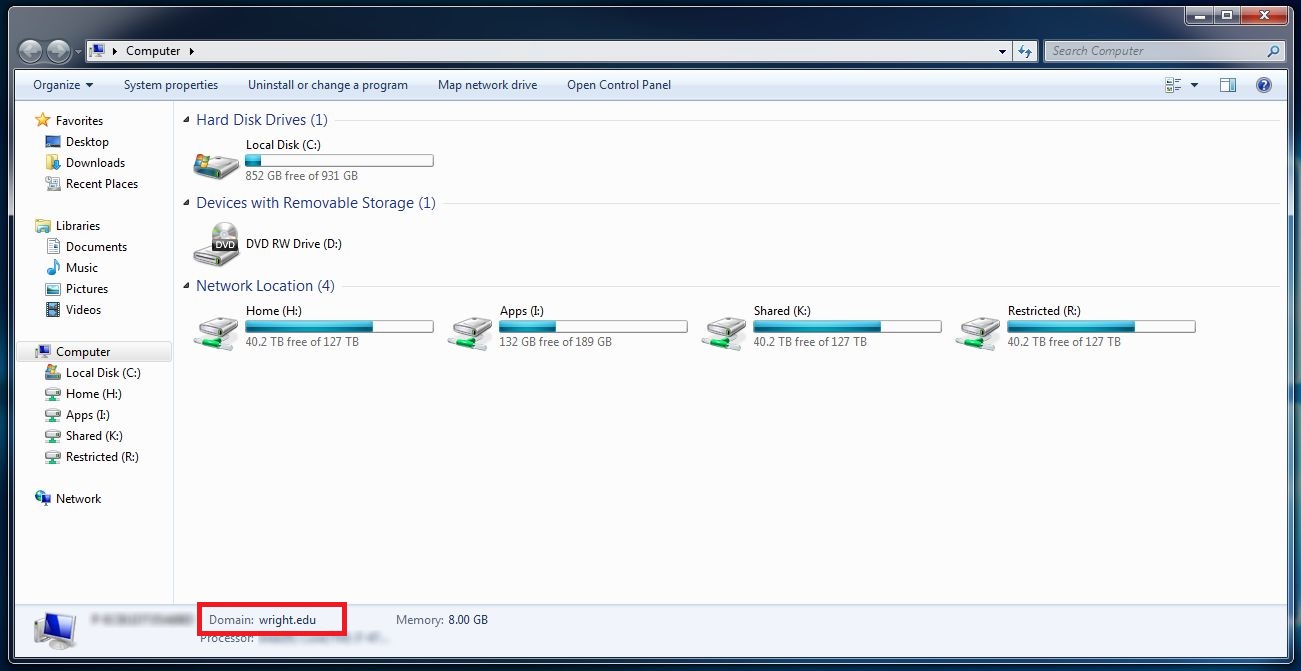
  2. In the bottom left-hand corner of your 'Computer' screen, the domain you are connected to will be listed. If you are on the university's domain, 'Domain: wright.edu' will be listed. 

If you have any questions confirming you are connected to the Wright State domain, call the CaTS Help Desk at (937) 775-4827, or email helpdesk@wright.edu.

Enhancements to University's Email Spam Service

Tuesday, April 19, 2016

Beginning Thursday, April 21, CaTS will be using Proofpoint's Targeted Attack Protection (TAP) service to help protect against specific threats that are distributed via email, including phishing and targeted attacks. These threats originate from malicious web sites which are triggered when users click on links in an email.

When a link in an email is clicked, TAP scans that URL. If the link is safe, the user will be taken to the original website. If the link is malicious, the user will see a page in the browser letting them know the site has been blocked.

TAP is being implemented as an enhancement to our existing spam filtering service. For more information about TAP, visit https://www.wright.edu/information-technology/security/targeted-attack-p....

For further questions about TAP, contact the CaTS Help Desk at (937) 775-4827, or email helpdesk@wright.edu.
 

Alternative Media Printing for Xerox Printers

Wednesday, April 13, 2016

Wright State Xerox printers allow you to print on multiple paper types, such as letterhead, envelopes, labels, and more. This guide gives instructions on this process. If you need further assistance, contact the CaTS Help Desk at (937) 775-4827 or send an email to helpdesk@wright.edu.

There are two ways to print to alternative media using Xerox printers.

Method #1: Secure Print Option (Recommended)

Method #2: Direct Print Option


Method #1: Secure Print Option (Recommended)

Note: This method uses the Secure Print option when printing your document. This is the preferred method as it does not interfere with other print jobs.

  1. With your document open, select the Print function. This is usually located under the File menu in most applications.
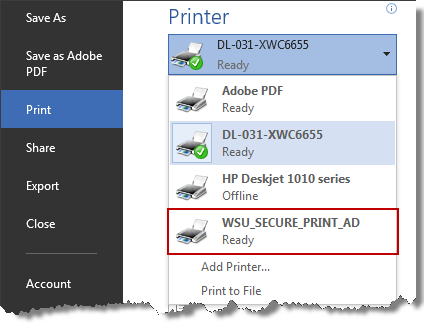
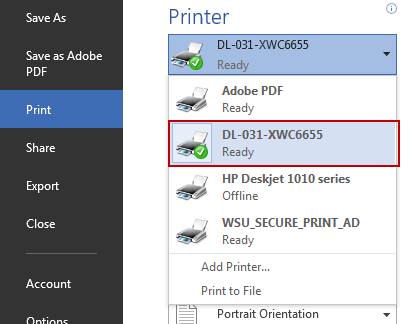
  2. Select the WSU_SECURE_PRINT_AD or WSU_SECURE_PRINT_NON_AD printer. If this option isn't available to you, visit the Secure Print website for installation instructions.
    secure-print-1.png
  3. Select the Printer Properties button (usually located directly under the selected printer).
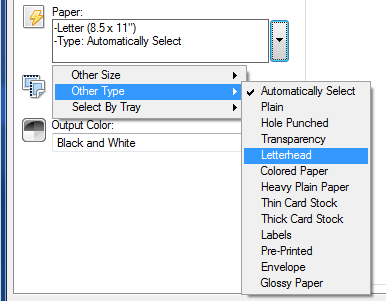
  4. Under the Paper section, click on the drop-down arrow to the right.
  5. Choose the paper size and type you want to print to (this example shows Letterhead).
    secure-print-2.png
  6. Click OK.
  7. Click Print. Enter your campus username and password if prompted.
    Note: Your print job has now been sent to the secure print queue, but won't print until you release the job by swiping your Wright1 Card or logging in to the printer.
  8. Go to the printer, but wait to swipe your Wright1 Card or log in.
  9. Open a printer tray and insert your desired media (letterhead, labels, etc.)
  10. Once you close the tray, options will appear on the printer screen, asking you to confirm what type of media you placed in the tray.
  11. Using the options at the bottom, select the size and type of the media you inserted. You must match this to the same setting you used earlier in steps 3-5.
  12. Tap the Confirm button in the top right.
  13. Swipe your Wright1 card, tap on the name of your print job, and then tap Print.
  14. Once your print job is complete, open the tray and replace the original media (usually plain printer paper).
  15. IMPORTANT: Once you close the tray, please follow steps 10-12 again to set the printer back to original settings. Failing to do this will stop further print jobs to this tray.

Method #2: Direct Print

Note: This method uses the Direct Print option, which will send your print job to your selected printer immediately. The drawback to this method is that the printer becomes unusable by anyone else until you have printed your document on the selected media. Printing with Method #1 above is recommended in order to avoid this situation.

  1. With your document open, select the Print function. This is usually located under the File menu in most applications.
  2. Select the printer you want to print to. If no printer is installed, visit the Direct Print website for installation instructions.

    secure-print-3.png
  3. Select the Printer Properties button (usually located directly under the selected printer).
  4. Under the Paper section, click on the drop-down arrow to the right.
  5. Choose the paper size and type you want to print to (this example shows Letterhead).
    secure-print-2.png
  6. Click OK.
  7. Click Print. Enter your campus username and password if prompted.
    Note: Your print job has now been sent directly to the printer and is awaiting the selected media type.
  8. Go to the printer. On the top left of the printer screen you should see a note that says "One or more queued jobs need resources."
    1. Reminder: At this point, no one else can print because the printer is waiting for you to insert your media and change the appropriate settings.
  9. Open a printer tray and insert your desired media (letterhead, labels, etc.)
  10. Once you close the tray, options will appear on the printer screen, asking you to confirm what type of media you placed in the tray.
  11. Using the options at the bottom, select the size and type of the media you inserted. You must match this to the same setting you used earlier in steps 3-5.
  12. Tap the Confirm button in the top right. Your job will now print.
  13. Once your print job is complete, open the tray and replace the original media (usually plain printer paper).
  14. IMPORTANT: Once you close the tray, please follow steps 10-12 again to set the printer back to original settings. Failing to do this will stop further print jobs to this tray.

Qualtrics Update

Friday, April 8, 2016

On April 8, Qualtrics launched it's new platform called the 'Qualtrics Insight Platform', which effects the look of the site when you login. The new platform will take effect on Tuesday, August 9.

Preview Period

  • You can switch back and forth between the new and current version during the preview period
  • You can access all your existing reports and data during the preview period and after the transition
  • All active surveys will be unaffected

Note: After August 9, you will no longer be able to switch between the original platform and the new Qualtrics Insight Platform

Returning to the Original Platform

  1. Login to wright.qualtrics.com with your campus 'w' username and password
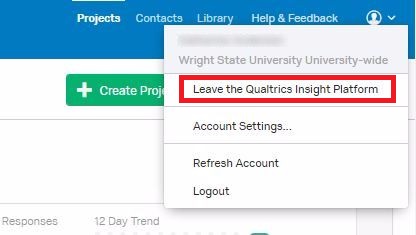
  2. In the upper right hand corner, click on the person icon
  3. Select 'Leave the Qualtrics Insight Platform' at the top of the dropdown list
  4. Select 'Leave the Qualtrics Insight Platform' in the pop-up window

For a complete overview of the new Qualtrics Insight Platform, visit the Qualtrics Support Page. If you have any questions or are having trouble switching views in Qualtrics, call the CaTS Help Desk at (937) 775-4827.

System Maintenance 4/10/16

Thursday, April 7, 2016

CaTS will be conducting system maintenance on Sunday, April 10, from 6 a.m. to 2 p.m. During this time access to all Banner-related services will be unavailable, including the following:

  • WINGS Express
  • Banner Admin
  • Wright1 Card Services
  • TouchNet
  • TK20
  • Parking Services
  • WrightBuy
  • Xtender
  • DARS

If you have any questions concerning this maintenance, please contact the CaTS Help Desk at (937) 775-4827, or send an email to helpdesk@wright.edu.

Demo the New Distance Learning Prototype Classroom

Wednesday, April 6, 2016

125 Oelman Hall has been remodeled to become an interactive distance learning classroom. This room will allow for synchronous classes, providing for two-way communication and student interaction. 

Live Demonstration

To see a live demonstration of this room, stop by and see us in 125 Oelman during the following times:

  • Monday 4/11: 8:30 – 10:00
  • Friday 4/15: 1:30 – 3:00
  • Wednesday 4/20: 9:00 – 10:30


Lake Campus faculty members are invited to join these demonstrations remotely using the portable version during the following times:

  • Monday 4/11: 8:30 – 10:00 in 181 Dwyer Hall
  • Friday 4/15: 1:30 – 3:00 in 150 Dwyer Hall
  • Wednesday 4/20: 9:00 – 10:30 in 224 Dwyer Hall 

Equipment Used In This Room

  • Cisco SX80 Codec - the control device for room interactions
  • Cisco SX10 Codec (portable version of the SX80)
  • 3 cameras 
  • Multiple microphone pods placed in the ceiling


How It Works

When an instructor walks into the room, the first step is using an iPad-like device to choose which room they want to connect to. Once the instructor begins talking, the SX80 uses a camera to follow the instructor around the room using facial recognition. Two additional cameras can also work in tandem to zoom in on audience members as they are talking.


Portable Option

Using the SX10 Codec portable version, you can turn any room into a receive site for the full functioning setup described above. Interaction is still available (audio and video) using a single camera and microphone solution.


Possible Future Enhancements

A benefit of using this system is the ability to easily upgrade software, which will allow for future features to be easily introduced. For example, new software can allow the instructor to use the SX80 to “predefine” where the whiteboards are in their room by setting one of the cameras to show the whiteboard. If the instructor who is being tracked by a camera approaches the whiteboard and starts to write on it, the cameras can immediately zoom in on the whiteboard. When the instructor moves away from the board, the cameras resume following them.

 

Pages